Tutorial: Upload a large file
This tutorial shows you how to upload a large file to the SBS Cloud, using multipart upload. Multipart upload means uploading the file in multiple parts, through a series of smaller consecutive uploads, as opposed to a single upload operation. Using a multipart upload is recommended for files exceeding 100 MB in size.
Prerequisites
To complete this tutorial, the following prerequisites must be in place:
- You must have a service access key that provides access to the File Management Service. For the scope of this tutorial, this can be accomplished by setting the key’s scope to
file-management-api:query:* file-management-api:mutation:*. For more information, see Generate a service access key. - In this tutorial, we split a large file into parts using a file splitter program (https://github.com/dubasdey/File-Splitter). You may use any file splitter application that you consider appropriate for the task. In most real-life scenarios, this prerequisite is not necessary, since splitting the file is assumed to take place programmatically.
- You need a test file that is reasonably large (100 MB or more). For convenience, in this example, we will be using an approximately 105 MB file and split it into two parts only.
Step 1: Split the file
Before you can upload a file using the multipart upload method, it must be split into parts (chunks). In production, you typically achieve this by writing program code that splits the file into chunks, where each chunk is an array of bytes. In this tutorial, for simplicity, we are using a file splitter instead:
-
Download the executable from https://github.com/dubasdey/File-Splitter and run it.
-
Select the source file to split and choose a size.
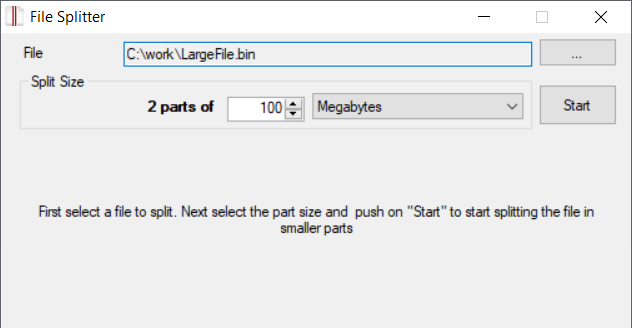 Each file part must be larger than 5 MB and less than 5 GB. There is no minimum size limit on the last part.
 -
Click Start. The chunk files are created in the same directory as the source file.
Step 2: Create the file
In this step, we are creating a new file in the cloud (largefile.bin). The goal is to obtain a file ID that will be required in the subsequent steps. To create the new file, run the following mutation:
mutation create_file($input:CreateFileInput) {
  createFile(input: $input) {
		id
  }
}
{
  "input": {
    "name": "largefile.bin"
  }
}
Take notice of the fileId returned in the response; you will need it in the next step.
Step 3: Initiate the upload
Initiating the upload requires the previously obtained fileId as input parameter. The goal is to obtain an upload ID that will be required in subsequent steps.
mutation initUpload($input:InitiateMultipartUploadInput!) {
  initiateMultipartUpload(input:$input) {
    uploadId
  }
}
In the variables, make sure to use the previously obtained fileId:
{
  "input": {
    "fileId": "YOUR_FILE_ID"
  }
}
Take notice of the uploadId returned in the response; you will need it in the next step.
Step 4: Generate the multipart upload URL
Now that you have a fileId and an uploadId, the next steps is to obtain the URLs where each of the file parts will be uploaded.
To obtain the upload URL for the first file part, run:
mutation genUploadUrl($input:GeneratePartUploadUrlInput!) {
  generatePartUploadUrl(input:$input)
}
In the variables, make sure to use the fileId and uploadId obtained previously.
{
  "input": {
    "fileId": "YOUR_FILE_ID",
    "uploadId": "YOUR_UPLOAD_ID",
    "partNumber": 1,
    "expiresIn": 3600
  }
}
In the code listing above, we are assigning a part number (1) to the upload and also set the upload URL to expire in 3600 seconds.
Since we have two file parts, make sure to run the same mutation for the second file part. The mutation should use the same variables, except for the part number, which must be set to 2.
Once this step is complete, you should end up with two upload URLs, one corresponding to each file part.
Step 5: Upload the bytes
You can now upload the file parts to their corresponding upload URLs that were generated previously. In your application, this should translate into code that sends an HTTP PUT request to the generated URLs. Your code may upload the file parts in any order (for example, part 2, and then part 1) as long as you use their correct upload URLs.
To simulate the upload behavior in our tutorial, we are going to run a cURL command that sends a PUT request to the upload URL.
- If you have a bash terminal, run:
curl --location --request PUT 'YOUR_UPLOAD_URL' --data-binary '@/path/to/your/part1.bin' -i - If you have a Windows terminal, run:
curl --location --request PUT "YOUR_UPLOAD_URL" --data-binary "@C:\part1.bin" -i
Note that your application must handle the HTTP response, in the sense that it must obtain the value of the ETag response header. For this reason, the cURL command above has the -i option; this will print the response headers.
Since we have two file parts, make sure to run the cURL command for each file part separately. Remember to replace the upload URL and local path of each file part before running the command.
Once this step is complete, you should end up with two ETag values, one corresponding to each file part.
Step 6: Complete the upload
This is the final step of the multipart upload. Running the following mutation will assemble the previously uploaded file parts into one file (the one identified by the fileId):
mutation completeUpload($input:CompleteMultipartUploadInput!) {
  completeMultipartUpload(input:$input) {
    name
    contentType
    contentLength
  }
}
In the variables, make sure to use the fileId, uploadId, and the ETag values obtained previously. In this example, we have uploaded two file parts, so there are only two items in the etags array.
{
  "input": {
    "fileId": "YOUR_FILE_ID",
    "uploadId": "YOUR_UPLOAD_ID",
    "etags": [
      {
        "partNumber": 1,
        "ETag": "YOUR_ETAG_RESPONSE_FOR_PART_1"
      },
       {
        "partNumber": 2,
        "ETag": "YOUR_ETAG_RESPONSE_FOR_PART_2"
      }
    ]
  }
}
The response includes details about the final file (file name, MIME type, and size in bytes). Note that, once this operation is completed successfully, the file parts no longer exist.
{
  "data": {
    "completeMultipartUpload": {
      "name": "largefile.bin",
      "contentType": "application/octet-stream",
      "contentLength": 110100480
    }
  }
}