Tax Declarations UI
From the Tax Declarations page of the SBS portal, you can perform the following actions:
- Generate tax declarations and track their status
- View all tax declarations for the currently selected account, application, tenant, and organization
- View all representatives and update their details (first name, last name, phone, email address).
- For each declaration, you can view its processes, input files, and representative details
- Filter, search and sort tax declarations.
Access
You can access the Tax Declarations page of the portal as follows:
- Sign in to the SBS Portal. During the sign-in process, you will be prompted to select the account, app, and tenant where you are entitled to sign in.
- Click Tax Declarations in the left hand-side menu.
- If applicable, select the organization from the drop-down list at the top of the page.
To interact with the Tax Declarations service, you can use either the Web UI or a GraphQL interface. You can switch at any time between the two interfaces by clicking the switch displayed at the top of the page:

View tax declarations
After you access the Tax Declarations UI, the tax declarations stored in SBS for the selected account, application, and tenant are displayed in the upper grid. To view details about a particular tax declaration, click the respective row in the grid. This loads all processes, files and representative details of that declaration in the lower grid, for example:
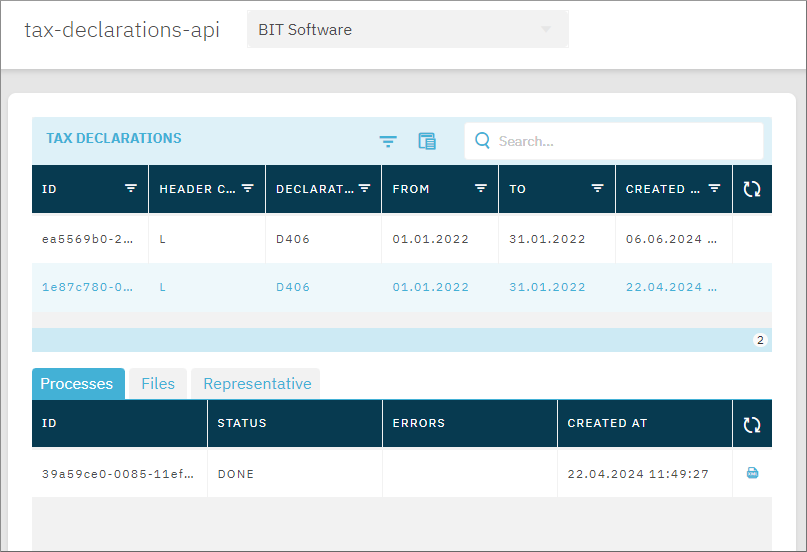
Tax declaration structure
The table below shows the declaration fields that are exposed through the Web UI. To return a declaration’s full list of fields, query it through GraphQL.
| Field | Description |
|---|---|
| ID | The unique identifier of the tax declaration in SBS. |
| Header comment | Specifies the reporting period covered by the declaration. L - for monthly returns (Romania), M - for monthly returns (Bulgaria), T - for quarterly returns (Romania), A - for annual returns (Romania, Bulgaria), C - for returns on request (Romania), D - for returns on demand (Bulgaria), NL - non-residents monthly (Romania), NT - non-residents quarterly (Romania). |
| Declaration type | Specifies the type of the declaration. Valid values: D406 - Romanian Standard Audit File for Tax, D406T - not in use, SAFT - Bulgarian Standard Audit File for Tax, KPI - Romanian KPI analysis only, with no SAF-T XML file generated. See View historical KPI data. |
| From | The start date of the reporting period. |
| To | The end date of the reporting period. |
| Created at | The date and time when the declaration was created. |
Process structure
A tax declaration may have multiple processes. A new process is created every time the declaration is computed (through a call to generateDeclaration mutation). A tax declaration’s process has the following structure:
| Field | Description |
|---|---|
| ID | The unique identifier of the process in SBS. |
| Status | The status of the declaration. Valid values: NEW - computation has not started yet, INPROCESS - computation is in progress, DONE - computation has completed without errors, ERROR - computation has completed with errors. |
| Errors | This field reports errors that occurred during processing, if applicable. |
| CSV Lines | The total number of lines across all input CSV files processed by this process. |
| Created at | The date and time when the process was created. |
 |
Click the icon to download the declaration’s result XML file to the local disk. |
 |
For Romanian D406 declarations with status DONE, click the icon to open the pre-computed analysis data in a separate browser tab. See View analysis data. |
 |
For the same processes as the Analysis data icon, click the icon to copy the Analysis Data viewer link to your clipboard, so that you can share it with someone who does not have portal access. See View analysis data. |
File structure
A tax declaration may have multiple input files. A tax declaration’s file has the following structure:
| Field | Description |
|---|---|
| ID | The unique identifier of the file in SBS. |
| File type | The type of data reported by the file. Valid values: GeneralLedgerAccounts, BusinessPartners, Assets, PhysicalStock, GeneralLedgerEntries, Invoices, Payments, MovementOfGoods, AssetTransactions. |
| Name | The file name. |
| Created at | The date and time when the file was created. |
Representative structure
A tax declaration has one representative (that is, the legal person who submits the tax declaration). A tax declaration’s representative has the following structure:
| Field | Description |
|---|---|
| ID | The unique identifier of the representative in SBS. |
| First name | The representative’s first name. |
| Last name | The representative’s last name. |
| Phone | The representative’s phone. |
| The representative’s email address. |
Filter, search, and sort tax declarations
To filter tax declarations by the values displayed in the grid, click the Filter  icon on the respective column header in the grid. The colour of the Filter icon on each column header denotes whether the filter is active:
| Icon | Meaning |
|---|---|
|
Filter is not active |
 |
Filter is active |
To search tax declarations, type your search text in the Search text box available in the right-upper corner of the grid. You can use any field as search term (for example, the tax declaration ID).
To sort tax declarations, click the respective column of the grid. The arrow indicates the current sorting order.
Generate declarations
Prerequisites
- The organization for which reporting is done must exist in the SBS system. You can add new organizations from the Organizations page.
- The following organization fields must be defined: Name, TIN (Tax Identification Number), Registration Number (registration number issued by the National Trade Registration Office), Country, Tax Accounting Basis, Street Address, IBAN Number.
- For Bulgarian tax declarations, the organization’s ownership structure must be defined (
ownershipStructureBG). See the Organizations page.
The high-level steps for generating a declaration are as follows:
- Obtain from your ERP system the input CSV files to be used as input to the tax declaration.
- Create a representative.
- Initiate the declaration.
- Add the input CSV files to the declaration.
- Generate the declaration.
- View the declaration status and download the result file.
Step 1: Obtain the input CSV files from your ERP
A tax declaration takes some or all of the following CSV files as input:
- BusinessPartners.csv
- GeneralLedgerAccounts.csv
- GeneralLedgerEntries.csv
- Invoices.csv
- Payments.csv
- PhysicalStock.csv
- MovementOfGoods.csv
- Assets.csv
- AssetTransactions.csv
The file names above are just an example; the actual file names may differ. Also note that you may provide multiple files of the same type as input. For example, you may use multiple CSV files of type “Invoice”.
The actual files and their content depend on your tax reporting jurisdiction and your resident vs non-resident tax status. For Romanian D406 declarations, the Header Comment you select in Step 3 decides which of these file types you must attach, which you may attach, and which the declaration type rejects. GeneralLedgerAccounts.csv is mandatory for every declaration type, and PhysicalStock.csv is also mandatory when the Header Comment is C. For details, see:
- Appendix 1: Input CSV Files (Romania Tax Residents).
- Appendix 2: Input CSV Files (Romania Non Residents).
- Appendix 3: Input CSV Files (Bulgaria Tax Residents).
- Appendix 10: Input file types by declaration type (Romania).
Step 2: Create a representative
A representative is the person that submits the declaration from a legal perspective. To create a declaration, at least one representative must be defined. Once added, you can use the representative’s details in multiple declarations.
To create a representative:
- Click the Representatives button at the top of the page.
- In the representatives grid, click Add
 and fill in the representative’s information. The fields First name, Last name, and Phone are mandatory.
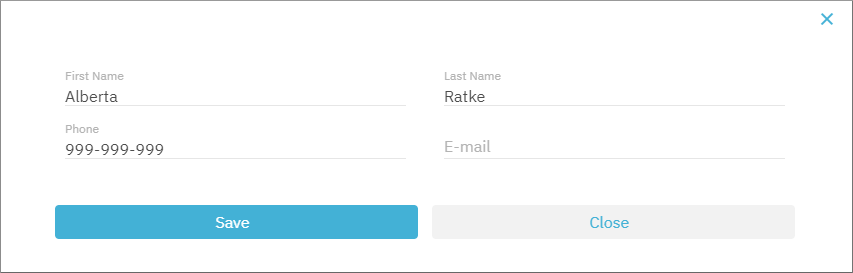
- Click Save.
You can update a representative’s details at any time later. To do that, click the Update  button for the respective row on the grid.
Deleting representatives is available only through GraphQL. To do that, run the deleteRepresentative mutation of the Tax Declarations Service.
Step 3: Initiate the declaration
To initiate a declaration:
- Click Declarations at the top of the page.
- If applicable, select an organization from the drop-down list.
- In the declarations grid, click Add and fill in the declaration details, for example:
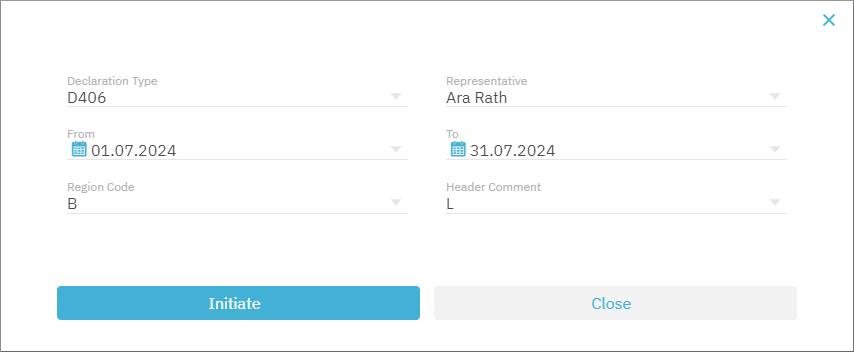
- Click Initiate. A new dialog box pops up where you can add the input CSV files to the declaration.
The input fields and their meanings are as follows:
| Attribute | Description |
|---|---|
| Declaration Type | Mandatory. Identifies the type of tax declaration that is to be computed. Valid values: D406 - Romanian Standard Audit File for Tax, D406T - not in use, SAFT - Bulgarian Standard Audit File for Tax, KPI - Romanian KPI analysis only, with no SAF-T XML file generated. See View historical KPI data. |
| Representative | Mandatory. Select the representative created in the previous step. NOTE: For Bulgarian tax declarations, the representative’s “Other titles” must be defined in order for the declaration to be processed successfully. |
| From | Mandatory. The start date of the reporting period covered by the tax declaration. |
| To | Mandatory. The end date of the reporting period covered by the tax declaration. |
| Audit File Country | Mandatory. Identifies the country (as a 2-letter country code) in which this tax declaration is reported. Valid values: RO, BG. |
| Region Code | Mandatory. Identifies the region/county/province within the tax authority. |
| Header Comment | Mandatory. Specifies the reporting period covered by the declaration. L - for monthly returns (Romania), M - for monthly returns (Bulgaria), T - for quarterly returns (Romania), A - for annual returns (Romania, Bulgaria), C - for returns on request (Romania), D - for returns on demand (Bulgaria), NL - non-residents monthly (Romania), NT - non-residents quarterly (Romania). For Romanian D406 declarations, this value also decides which input CSV file types are mandatory, optional, or not permitted; see Appendix 10: Input file types by declaration type (Romania). |
| Tax Accounting Basis | Mandatory. Specifies the tax accounting basis to be used for this declaration. For valid values, see Appendix 6: Tax Accounting Basis. |
Step 4: Add the input CSV files
After you initiate a declaration, a dialog box pops up from where you can add the input CSV files to the declaration.
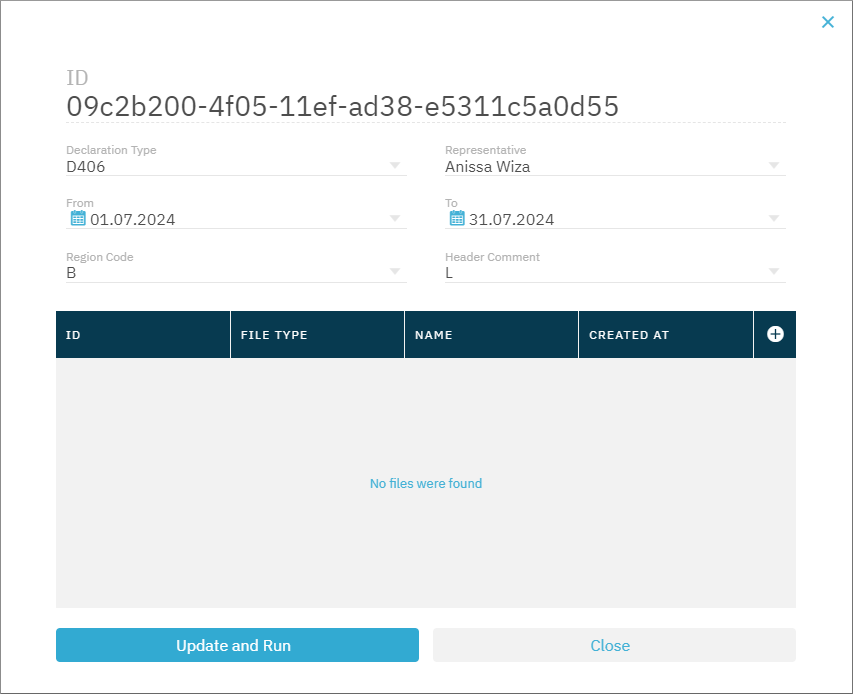
To add input CSV files to a declaration:
-
Click Add
. -
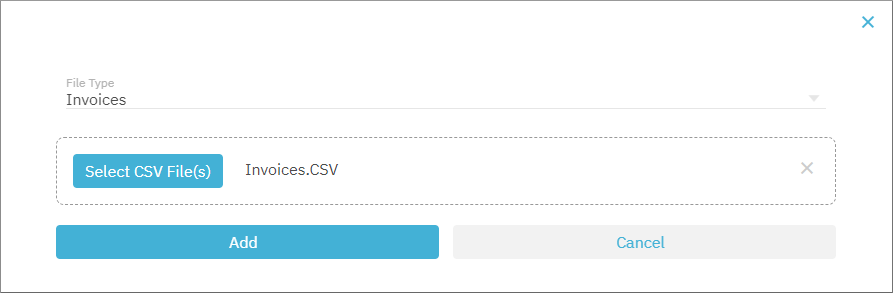
In the dialog box that pops up, select a file type (for example “Invoices”), and then click Select CSV File(s) to add the respective file from your hard drive.
-
Click Add, and be patient while the file is uploading. The upload may take several seconds to several minutes, depending on the size of the input file, and your internet connection speed. After a successful upload, the dialog box closes, and the declaration file should appear in the list of declaration files.
-
Repeat steps 1-3 for all files that should be added as input to the declaration.
Step 5: Generate the declaration
After you have added all files to the declaration, you can trigger the actual generation process.
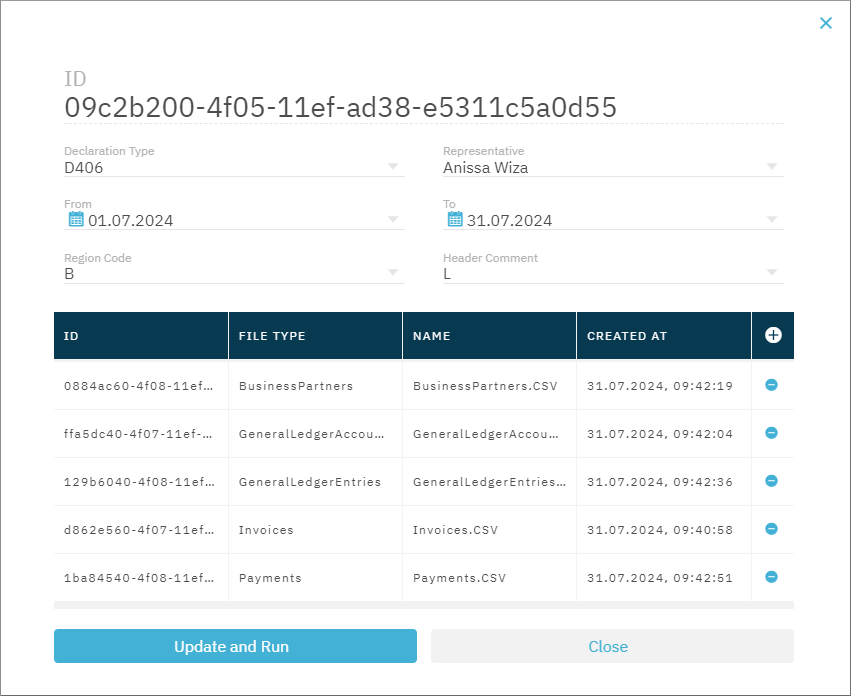
To generate the declaration, click Update and Run. The declaration dialog box closes, and you can now track the declaration status from the Processes tab.
For a Romanian D406 declaration, the run starts only if every file type mandatory for the Header Comment is attached — GeneralLedgerAccounts, plus PhysicalStock for C — and every attached file type is one that the Header Comment permits. Otherwise the Portal reports an error that names the file types at fault, along with the file types accepted for that Header Comment. Correct the declaration files and click Update and Run again.
Step 6: View the declaration status and download the result file
Whenever you run a declaration, a new process is added to the declaration that reports its status. Note that, if you run the same declaration multiple times, a new process will start for each run.
To view a declaration’s processes, click a declaration record in the Declarations grid. The lower grid should now be populated with that declaration’s processes, if any (in the “Processes” tab). The declaration’s files and representatives can be viewed from the Files and Representative tabs, respectively.
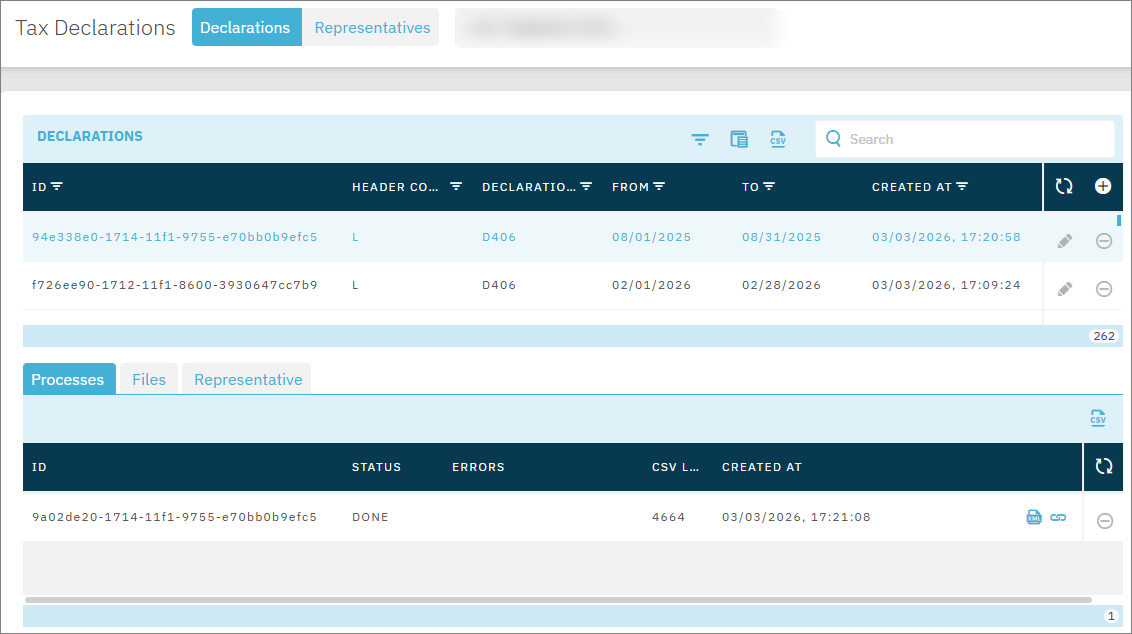
Initially, each process has the status NEW. After a short time (approx. 1 minute), the status changes to INPROCESS. This status will keep showing for as long as the declaration is being computed, which may take several minutes to several hours, depending on the size of the input files.
The Processes grid does not refresh automatically. Click Refresh  to obtain the latest process status.
If validation or other errors are encountered during the computation, the process status changes to ERROR and the actual errors are reported in the respective column.
If the declaration was generated successfully, the process status changes to DONE, and an XML download icon becomes available. Click the icon to download the generated declaration file.
For Romanian D406 declarations, an analysis data icon also becomes available once the process reaches DONE status. See View analysis data.
View analysis data
For Romanian D406 declarations, once the computation process reaches DONE status, the portal automatically computes account balances, financial KPIs (Key Performance Indicators), and other analysis data from the submitted CSV files. To open the analysis viewer, click the analysis data icon in the process row. The viewer opens in a separate browser tab and organizes the data into the following tabs: System Balance, Standard Balance, KPI, Tax Code Centralizer, and Consistency Validations.
To share the Analysis Data viewer link with someone who does not have portal access, for example a colleague, an accountant, or an auditor, click the Copy Analysis Data Link icon next to the analysis data icon in the process row, instead of opening the viewer directly:
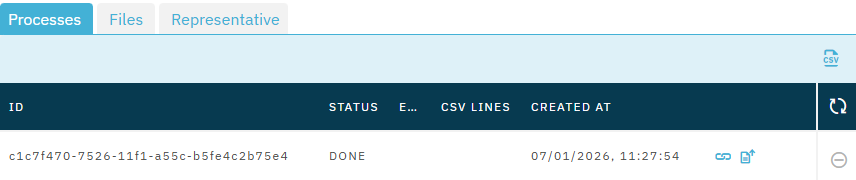
The link is copied to your clipboard, and a confirmation message is displayed. Opening the copied link loads the Analysis Data viewer directly, without requiring the recipient to sign in to the portal.
System balance
The System Balance tab (Balanța analitică in Romanian) shows the organization’s actual, system-of-record account balances, using the account IDs and account names from your own chart of accounts. It corresponds to the systemBalanceSheet field of the analysis data.
| Column | Description |
|---|---|
| Account ID | The account identifier. |
| Account | The account name. |
| Standard Account | The identifier of the corresponding standard account. |
| Opening Debit | Opening debit balance for the account. |
| Opening Credit | Opening credit balance for the account. |
| Current Debit | Current-period debit turnover for the account. |
| Current Credit | Current-period credit turnover for the account. |
| Closing Debit | Closing debit balance for the account. |
| Closing Credit | Closing credit balance for the account. |
Accounts are grouped by account class, with a subtotal row for each class, and a grand total row at the bottom of the grid.
Standard balance
The Standard Balance tab (Balanța sintetică in Romanian) maps the organization’s account balances to the standard chart of accounts prescribed by the tax authority for the corresponding tax accounting basis. It corresponds to the standardBalanceSheet field of the analysis data.
| Column | Description |
|---|---|
| Account ID | The account identifier. |
| Standard Account | The account name. |
| Opening Debit | Opening debit balance for the account. |
| Opening Credit | Opening credit balance for the account. |
| Current Debit | Current-period debit turnover for the account. |
| Current Credit | Current-period credit turnover for the account. |
| Closing Debit | Closing debit balance for the account. |
| Closing Credit | Closing credit balance for the account. |
As with the System Balance tab, accounts are grouped by account class, with a subtotal row for each class, and a grand total row at the bottom of the grid.
KPI
The KPI tab organizes the financial KPIs computed from the submitted data into the following groups:
| Group | Description |
|---|---|
| Profitability | Revenue, profit, and margin indicators (CA, EAT, EBT, EBIT, EBITDA, MB, RCT, MPN, VE). |
| Liquidity | Accounts receivable, accounts payable, and cash liquidity (CR, DAT, CL). |
| Activity | Customer and supplier counts, invoice averages, and receivables rotation metrics (NFC, NFF, VMF, NPC, RRC, RAC, RRF). |
| Tax | Output VAT, input VAT, and net VAT position (TVAC, TVAD, TVAN). |
| Assets | Fixed asset value, periodic depreciation, and return on asset investment (VBI, AMP, RAI). |
For the full list of KPI definitions and formulas, see Appendix 9: RO D406 KPI Definitions in the Tax Declarations Service API reference.
Tax Code Centralizer
The Tax Code Centralizer tab lists, for each tax code in the declaration, the tax base, tax amount, and applied rate reported by each of the three SAF-T sources — General Ledger Entries (GLE), Invoices, and Payments — alongside the official rate published by the Romanian tax authority (ANAF). Comparing these values across sources, and against the ANAF rate, lets you spot rate or amount discrepancies without cross-checking the raw CSV files by hand.
The tab presents the data as a grouped-header table. The three leading columns describe the tax code, and the three column groups that follow — GLE, Invoices, and Payments — each span the same three metrics:
| Column | Description |
|---|---|
| Tax Code | The tax code. |
| Name | The tax code’s name from the ANAF nomenclature, shown in Romanian or English according to the active display language. Empty when the code is not in the nomenclature. |
| Percentage (ANAF) | The official rate for the tax code, from the ANAF nomenclature. Empty when the code is not in the nomenclature, or when the nomenclature does not define a single fixed rate for it. |
Under each of the GLE, Invoices, and Payments groups:
| Column | Description |
|---|---|
| Base | The tax base reported for the tax code by that source. |
| Amount | The tax amount reported for the tax code by that source. |
| Percentage | The rate applied for the tax code by that source. |
Rows are ordered by tax code, ascending. When a source reports no data for a tax code, that source’s Base, Amount, and Percentage cells are empty for the row.
When a source’s Percentage differs from the Percentage (ANAF), that cell is highlighted with an amber badge, flagging the divergence for review — surfacing these rate differences is the main purpose of the tab. Rows whose tax code is not in the ANAF nomenclature (empty Name and Percentage (ANAF) cells) are never flagged, because there is no official rate to compare against.
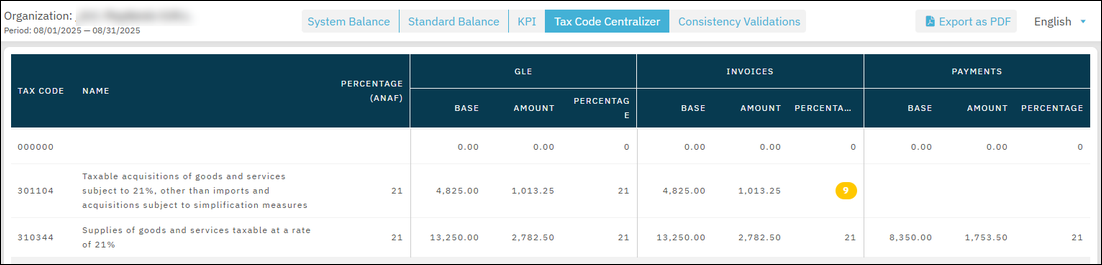
The centralizer data can also be retrieved programmatically. See Comparing tax reported per tax code and the ROD406TaxCodeCentralizerEntry type in the Tax Declarations Service API reference.
Consistency Validations
The Consistency Validations tab (Validări de consistență in Romanian) lists the outcome of every consistency test run against the declaration. These tests are the checks that the ANAF DUK Integrator validator does not cover: the tests the Romanian tax authority (ANAF) publishes, plus five checks that verify the dates on your records fall inside the declaration’s reporting period.
The results are advisory. A failed test does not prevent the declaration from being generated or submitted, and some tests report a failure in situations to which they do not apply, so review each one before acting on it.
| Column | Description |
|---|---|
| Code | The identifier of the test. A numbered code such as 1.5 is an ANAF test; a four-letter code such as INVD is one of the period-date checks. |
| Description | What the test verifies, in Romanian. |
| Status | The outcome of the test: Succeeded, Failed, or Skipped. |
| Message | The reason the test failed, or the reason it was skipped. Empty for a test that succeeded. |
The status is shown as a colored badge — green for Succeeded, red for Failed, and grey for Skipped. A test is Skipped when it does not apply to the declaration: because it needs an input file type you did not attach, because it compares consecutive reporting periods, or because the declaration contains nothing for it to examine. Its Message states which.
Click any column header to sort the grid by that column. Messages wrap in full inside their cell, so a failure that lists several records stays readable without a tooltip. Rows appear in the order the service returns them.
If the declaration has no validation results, the tab displays No Data.
For the meaning of each period-date check, the date it examines, and the format of its message, see Period-date checks in the Tax Declarations Service API reference. To read the same results programmatically, see How to view consistency-test results and the ROD406Validation type.
The analysis data can also be retrieved programmatically via the roD406AnalysisData query.
View historical KPI data
In addition to the single-period KPIs shown on the KPI tab of a D406 declaration’s analysis data, you can view the same financial KPIs as a month-by-month trend across several past reporting periods. To do this, initiate a declaration with Declaration Type set to KPI instead of D406.
Unlike a D406 declaration, a KPI declaration does not produce a SAF-T XML file for submission; its only purpose is to compute historical KPI trends for review in the portal or through the API. For details on the underlying query, see roKPIAnalysisData in the Tax Declarations Service API reference.
Generate a KPI declaration
To generate a KPI declaration:
- Click Declarations at the top of the page.
- If applicable, select an organization from the drop-down list.
- In the declarations grid, click Add and set Declaration Type to KPI.
- Fill in the remaining fields as you would for a D406 declaration. Set From and To to the period you want covered by the trend (for example, the past 3 years up to the current date), and set Header Comment to L (Monthly).
- Click Initiate.
- Add the GeneralLedgerAccounts and GeneralLedgerEntries CSV files for the most recent month in the period. You can optionally also add an Invoices file for that month to populate the invoice-derived Activity KPIs (see Historical KPI viewer). For a KPI declaration, the file-type selector offers only these three types.
- Click Update and Run to generate the declaration.
Once the process reaches status DONE, click the analysis data icon in the process row to open the historical KPI viewer in a separate browser tab.
Historical KPI viewer
The historical KPI viewer organizes the data into the following tabs:
| Tab | Description |
|---|---|
| Profitability | Turnover, profit, and margin trends (CA, EAT, EBT, EBIT, EBITDA, MB, RCT, MPN, VE, CT). |
| Liquidity | Commercial receivables, accounts payable, and net working capital trends (CR, DAT, CL). |
| Activity and Efficiency | Invoice counts, business partner counts, and turnover-rate trends (NFC, NFF, VMF, NPC, RRC, RAC, RRF). |
| Tax Analysis | VAT collected, VAT deductible, and net VAT position trends (TVAC, TVAD, TVAN). |
For the full list of KPI definitions and formulas, see Appendix 9: RO D406 KPI Definitions in the Tax Declarations Service API reference.
Each tab shows a line chart plotting every KPI in that group across the months of the reporting period, followed by a table with one row per month.
Because the current month of a KPI declaration has only GeneralLedgerAccounts and GeneralLedgerEntries uploaded — and, optionally, Invoices — some KPIs for that month may show no value:
- Liquidity KPIs are not computed for the current month, because they require the full set of declaration files.
- Invoice-derived Activity and Efficiency KPIs — sales invoice count (NFC), purchase invoice count (NFF), average sales invoice value (VMF), and active business partner count (NPC) — are computed for the current month only if you also upload an Invoices file for that month. Without it, these KPIs show no value. KPIs derived only from the general ledger, such as the turnover-rate ratios (RRC, RAC, RRF), are always computed.
For example, for an organization with a monthly D406 declaration for August 2025 and a KPI declaration covering August 1, 2025 through September 30, 2025 (with only GeneralLedgerAccounts and GeneralLedgerEntries uploaded for September), the historical KPI viewer shows two months of data: August 2025, fully populated from the existing D406 declaration, and September 2025, partially populated as described above. If you also upload an Invoices file for September, that month’s invoice-derived Activity KPIs are populated as well.
The historical KPI data can also be retrieved programmatically via the roKPIAnalysisData query.
Delete declarations
To delete a declaration, click the Delete  button adjacent to the declaration of interest.
GraphQL
For information about working with tax declarations through GraphQL, see the API reference to the Tax Declarations Service.