e-Transport UI
From the e-Transport page of the SBS portal, you can perform the following actions:
- View the list of shipments created by your organization
- For each shipment, view its stages (such as Notification, Modification, Deletion), and download any accompanying XML files
- Sort and filter shipments and shipment stages
- View real-time e-Transport messages from ANAF
- View real-time e-Transport carrier messages from ANAF
Before using the e-Transport service, make sure that an organization exists which has been authorized with ANAF.
Access
You can access the e-Transport page of the portal as follows:
- Sign in to the SBS Portal. During the sign-in process, you will be prompted to select the account, app, and tenant where you are entitled to sign in.
- Click RO e-Transport in the left hand-side menu.
- If applicable, select the organization from the drop-down list at the top of the page.
To view or manage e-Transport data for a different, account, app, or tenant, switch accounts.
To interact with the e-Transport service, you can use either the Web UI or a GraphQL interface. You can switch at any time between the two interfaces by clicking the switch displayed at the top of the page:

Shipments
Shipments are e-Transport notifications created by your organization and uploaded to ANAF, with the purpose of obtaining a UIT - unique transport identification number. A shipment may consist of multiple stages. At the minimum, each shipment contains a “Notification” stage. When you modify a shipment record, however, a new “Modification” stage is created. Likewise, if you delete a shipment record, a “Deletion” stage is created.
View shipments
To view shipments:
- If applicable, select the organization from the drop-down list at the top of the page.
- Click the Shipments tab.

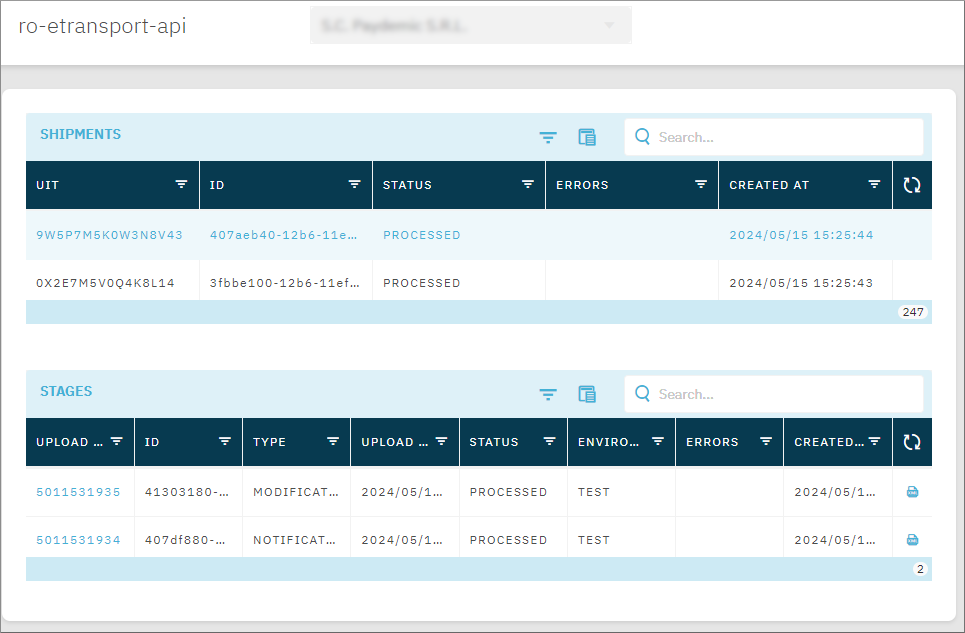
Whenever you click a row in the Shipments grid, its stages are loaded in the Stages grid.
By default, shipments are ordered by their creation date, most recent first. To refresh the grid, click Refresh  in the top-right corner of the grid.
The “Shipments” grid contains the following columns:
| Column | Purpose |
|---|---|
| UIT | The unique transport identification number assigned to the shipment by ANAF. If the shipment was created with errors, a UIT may not be available. |
| ID | The unique identifier of the shipment in SBS. |
| Status | The shipment status. Valid values: UPLOADED - an UIT was obtained, however, the shipment is not confirmed as accepted by ANAF, PROCESSED - ANAF has accepted the shipment, CONFIRMED - either the sending or receiving party has confirmed successful delivery, UPLOAD_FAILED - an upload of the e-transport declaration to ANAF was attempted but it has failed, CONFIRMATION_FAILED - a confirmation transaction was accepted but it failed, DELETED the UIT was cancelled, DELETE_FAILED - an UIT cancellation was attempted but it failed, REJECTED - ANAF has rejected the shipment. |
| Errors | The processing errors associated with this shipment, if any. |
| Created at | The date and time when the shipment was created in SBS. |
SBS fetches the latest information from ANAF every minute. So, for example, if the status is UPLOADED, then you will need to wait at least 1 minute and then click the refresh button to get the latest status information. This applies both to shipments and shipment stages.
Shipment stages
The “Stages” grid contains the following columns:
| Column | Purpose |
|---|---|
| Upload ID | A unique upload ID assigned to the shipment by ANAF. |
| ID | The unique identifier of the shipment stage in SBS. |
| Type | The type of action that was taken against the original shipment. This can be one of the following: NOTIFICATION, MODIFICATION, CONFIRMATION or DELETION. |
| Upload date | Each stage means that a file upload to ANAF was attempted, where the file has any of the types mentioned above. This column indicates the date and time when the actual upload took place. |
| Status | The shipment status. Valid values: UPLOADED - the changes have been uploaded and await resolution by ANAF; PROCESSED - the changes have been accepted by ANAF, REJECTED - the changes have been rejected by ANAF. |
| Errors | The processing errors associated with this shipment, if any. |
| Created at | The date and time when the shipment stage was created in SBS. |
To download the XML file associated with each stage, click the XML ![]() icon on the respective row.
icon on the respective row.
Choose grid columns
Optionally, you can customize the grid to display less columns. This apples for both “Shipments” and “Stages” grids.
To remove a column from the grid:
- Click the Column chooser
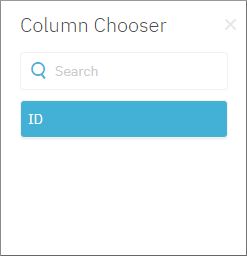
 button on the grid. The Column Chooser dialog appears.
 - Drag a column header from the grid onto the column chooser area.
To add a column back the grid:
-
Click the Column chooser
 button on the grid. The Column Chooser dialog box appears:
-
Drag the column of interest from the column chooser onto the grid.
Filter shipments by creation date
You can filter shipments by the date they were created in SBS. To do this, use the date picker available above the grid. By default, this filter is set to display all shipments starting with the 1st of the current month up to today’s date.
To change the date range:
- Click twice on any date except the first date of the currently visible range. A single date is selected.
- Click a date previous or subsequent to the selected date to create the range.
Create shipment
Creating shipments is available only from the GraphQL interface. For details, see the notify method of the e-Transport Service Reference.
Modify vehicle
You can inform ANAF of a modification to an existing shipment, for the duration of the UIT validity period. To modify the vehicle information of an existing shipment:
- Click the
 Edit button next to the shipment you want to modify.
 - On the Modify Vehicle tab, change the vehicle information as needed, and then click Modify Vehicle.
The fields you can submit are as follows:
| Field | Description |
|---|---|
| Vehicle number | Mandatory. The vehicle plate registration number. |
| Trailer 1 number | Optional. The plate number of the first vehicle trailer. |
| Notes | Optional. Use this field to provide any additional notes. The value must not exceed 200 characters. |
| Trailer 1 number | Optional. The plate number of the second vehicle trailer. |
| Modification date | Mandatory. The date and time when the vehicle swap will take place. The value must not exceed the UIT validity period and must not be prior to the declaration date. |
| Declarant reference | Optional. A reference generated by the declarant for own purpose. This value must not exceed 50 characters. |
After you click Modify Vehicle, the information is submitted to ANAF and the shipment stage gets the status UPLOADED. Be patient for a few minutes while a response from ANAF is received. Click the  Refresh button to get the latest shipment status. In case of success, the stage status should change to PROCESSED. Otherwise, the status is REJECTED and the Errors column displays the rejection reason.
Confirm shipment
To send a shipment confirmation to ANAF:
- Click the
 Edit button next to the shipment you want to confirm.
 - On the Confirm tab, enter the confirmation details as required, and then click Confirm.
The fields you can submit are as follows:
| Field | Description |
|---|---|
| Type | Mandatory. The confirmation type. Valid values: 10 - Confirmed, 20 - Partially confirmed, 30 - Disclaimed. |
| Notes | Optional. Use this field to provide any additional notes. The value must not exceed 200 characters. |
| Declarant reference | Optional. A reference generated by the declarant for own purpose. This value must not exceed 50 characters. |
After you click Confirm, the information is submitted to ANAF and the shipment stage gets the status UPLOADED. Be patient for a few minutes while a response from ANAF is received. Click the  Refresh button to get the latest shipment status. In case of success, the stage status should change to PROCESSED. Otherwise, the status is REJECTED and the Errors column displays the rejection reason.
Delete shipment
For shipments that you would like to cancel, you can send to ANAF a “deleted shipment” notification. Note, however, that ANAF will reject deletion requests if the UIT shipment has already started (that is, if shipment date is today or in the future).
To send a “deleted shipment” notification to ANAF:
- Click the
 Edit button next to the shipment you want to confirm.
 - Click the Delete tab.
- Optionally, enter a declarant reference.
- Click Delete.
After you click Delete, the information is submitted to ANAF and the shipment stage gets the status UPLOADED. Be patient for a few minutes while a response from ANAF is received. Click the  Refresh button to get the latest shipment status. In case of success, the stage status should change to PROCESSED. Otherwise, the status is REJECTED and the Errors column displays the rejection reason.
Debug stage status
Under normal circumstances, refreshing the “Shipments” and the “Stages” grids fetches the latest available information from ANAF. However, if system failures or API downtime occur in the process of exchanging data with ANAF, the displayed shipment stage status may be out-of-sync with ANAF.
To help you work around such issues, SBS provides a debug button that is displayed in the “Stages” grid for each stage that has the status UPLOADED. Click the debug button to issue a real-time query to ANAF and get the latest information about the respect shipment stage as it currently stands with ANAF.

Messages
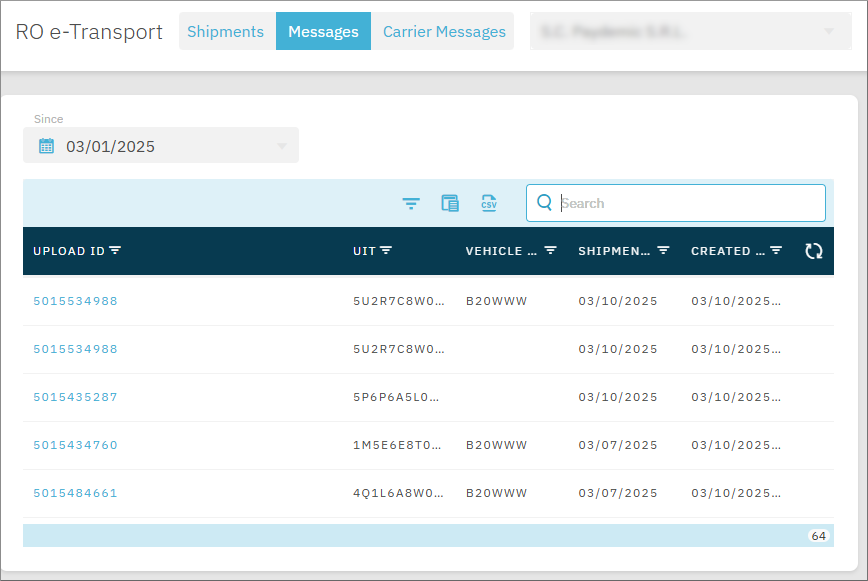
The Messages tab displays a list of messages as provided by ANAF in real time.

A message indicates that ANAF has registered an event in connection with a shipment. The most important information about each message is displayed directly on the grid, namely:
- Upload ID - The identifier obtained from ANAF after uploading the declaration file.
- UIT - The unique transport identification number assigned to the shipment by ANAF.
- Vehicle Plate Number - The plate number of the vehicle involved in the event, if available.
- Shipment Date - The date when the shipment is due to take place.
- Created At - The date when the record was created in Socrate Business Services.
To view full details of a message, click the Upload ID column of the grid.
By default, the grid shows messages starting with the 1st of the current month. Use the calendar picker to load earlier messages. Note, however, that you can load messages from the past 60 days only, which is the current limit set by ANAF.
Carrier messages
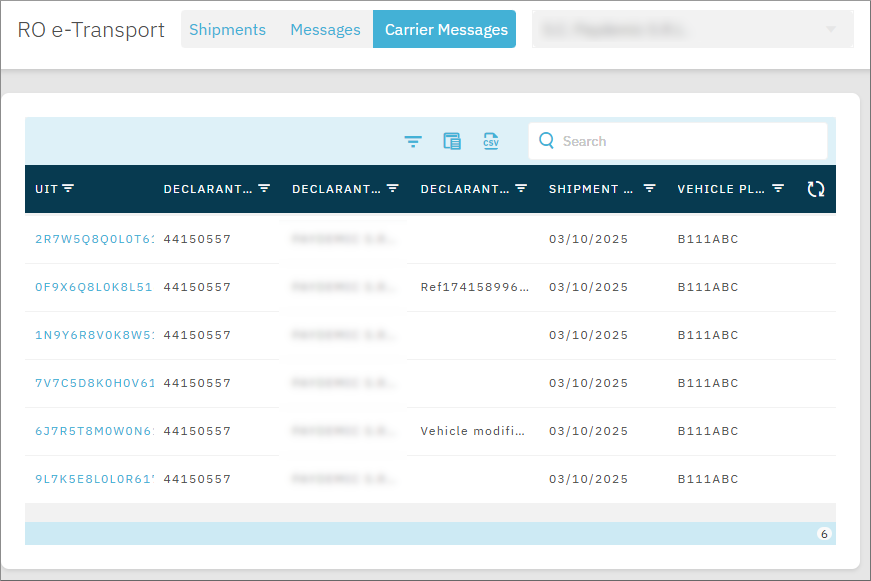
The Carrier Messages tab displays a list of messages available from ANAF for e-transport carrier organizations. Information in this tab is relevant only if your company has been declared as a carrier when the shipment notification was submitted to ANAF.

The most important information about each carrier message is displayed directly on the grid, namely:
- UIT - The unique transport identification number assigned to the shipment by ANAF.
- Declarant Code - The tax identification number of the declaring entity.
- Declarant Name - The name of the declaring entity.
- Declarant Reference - A reference generated by the declaring entity from their system on obtaining the UIT.
- Shipment Date - The date when the shipment is due to take place.
- Vehicle Plate Number - The plate number of the vehicle involved in the event, if available.
To view full details of a message, click the UIT column of the grid.
Note that carrier messages are available from ANAF only while there are active shipments.