Email UI
From the Email page of the SBS portal, you can perform the following actions:
- Send email to one or multiple TO, CC, or BCC recipients. You can send email: a) from the default email address
no-reply@socrate.emailb) from a custom, verified email address, c) from any email address of a verified domain, d) from a Google or Microsoft address authorized via app password. - View and delete the inbound email for the currently selected account/app/tenant.
- View and delete the outbound email for the currently selected account/app/tenant.
- View and configure the email accounts entitled to send email from SBS (also known as “email identities”), and their verification status (pending, verified).
- View and configure the third-party email accounts verified by app-password that are entitled to send email from SBS.
- View and configure the Internet domains entitled to send email from SBS (also known as “domain identities”), and their verification status (pending, verified).
- Manage a list of authorized email senders for each domain identity.
- View and configure the email domain at which all email is received for the current account/app/tenant (also known as the “inbound domain”).
- Debug failed email delivery. More specifically, you can view whether a particular email address is blocked for email delivery by the Amazon SES suppression list. You can also remove an email address from the Amazon SES suppression list if it’s found there. For details, see Address Status (Amazon SES suppression list).
Limitations
Currently, the following features are not supported by the UI:
- Sending email with attachments
- Sending email from a Google or Microsoft email address authorized through OAuth 2.0.
- Sending email that use predefined templates.
Note, however, that all the features above are supported if you use the API directly. For details, see the API reference to the Email Service.
Note
All the actions available to you in the portal are based on the permissions assigned by your supervisor. This applies both to the Web UI and the GraphQL interfaces.
Access
You can access the Email page of the portal as follows:
- Sign in to the SBS Portal. During the sign-in process, you will be prompted to select the account, app, and tenant where you are entitled to sign in.
- Click Email in the left hand-side menu.
To interact with the Email service, you can use either the Web UI or a GraphQL interface. You can switch at any time between the two interfaces by clicking the switch displayed at the top of the page:

Send email
To send an email:
- Click the Compose button available in the top-right corner of the page. A dialog box pops up.
- Fill in the fields as required. The only mandatory field is TO. (Alternatively, use the CC or BCC fields.)
- Click Send.
Note the following:
- To add multiple recipients in the TO, CC, and BCC fields, separate the email addresses by a comma.
- If you do not specify a From email address, the email message will be sent from the default email address
no-reply@socrate.email. - If you specify a From email address, it must be (a) a verified email address, (b) an authorized email sender, or (c) a Google or Microsoft address authorized via app password.
- Fill in the App password and App Password Provider fields only if you intend to use the scenario (c) above. However, if you opted to store your app password in SBS, then you may leave these fields empty.
- For more information about all the input parameters, see the API Reference.
Inbound email
To view the inbound email, click the Inbox tab. By default, the grid shows email messages received within the past 7 days. To show messages for a different time period, select a different date interval from the Created at Date picker.
Click a row in the grid to display a dialog box with full details about a particular email message.
To delete one or more messages, select the check box adjacent to them, and then click Delete Section.
Outbound email
To view the outbound email, click the Sent tab. By default, the grid shows email messages sent within the past 7 days. To show messages for a different time period, select a different date interval from the Created at Date picker.
Click a row in the grid to display a dialog box with full details about a particular email message.
To delete one or more messages, select the check box adjacent to them, and then click Delete Section.
Authorized senders
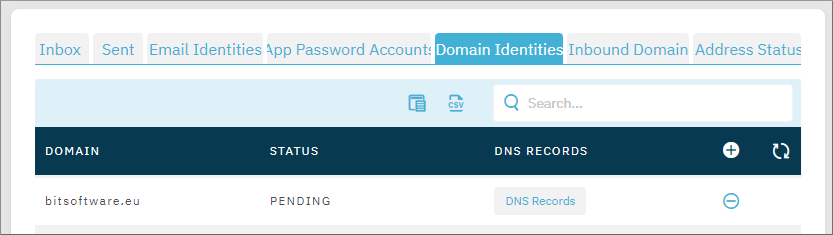
The Authorized senders tab displays email domains and addresses authorized to send email for the current account, application, and tenant. (The current account, application, and tenant are displayed at all times in the top application bar.) There are two grids on the page, namely:
- The upper grid displays domains that are currently configured to send email. The domain status may be one of the following:
- PENDING - this status indicates that a domain verification request was initiated, but the DNS information has not been added or propagated yet. Domains having this status cannot send email.
- VERIFIED - the domain verification has completed successfully.
- The lower grid displays the email addresses authorized to send email, if any. For example, if you verified the domain example.org, then you can add addresses such as alice@example.org or bob@example.org as authorized senders.
Verify a domain identity
To configure a domain for sending email, it must be verified first.
To verify a domain identity:
-
Click Email in the left hand-side menu.
-
Click the Authorized Senders tab.
-
In the upper grid, click Add
 . A dialog box pops up.
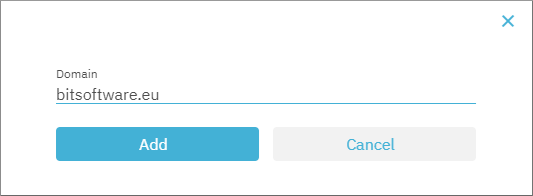
-
Enter the domain name to be verified (for example, example.org). Although optional, it is recommended that you also select the Restrict to authorized senders check box. For the meaning of this option, see Restrict sending email to authorized senders.
-
Click Add. The domain record should now appear in the grid with the PENDING status.
-
Click the DNS Records button. A dialog box opens that contains a list of four DNS entries.
There are three DNS records for the “eu-central-1” region in the Amazon Web Services (AWS) global infrastructure. The fourth DNS record authorizes the tenant to send emails with SBS.
-
Add to your domain’s DNS records the DNS records as given above. The instructions will vary depending on your domain provider.
domainIdentities query above returns the status PENDING and lists any pending DNS records. When DNS propagation is complete, the status becomes VERIFIED.
GraphQL
You can also verify domains programmatically, by running the verifyDomainIdentity mutation of the Email Service.
Restrict sending email to authorized senders
The Authorized senders only column in the upper grid has the following purpose:
- If TRUE, only authorized email senders present in the lower grid are allowed to send email. For example, if the verified domain identity is
example.org, andsupport@example.orgis an email sender, then API callers can send email only if they usesupport@example.orgin the “from” field. - If FALSE, API callers can send email originating from the verified domain even if no authorized email senders were created for that domain. For example, if the verified domain is
example.org, then API callers can send email from any email address on the current domain:alice@example.org,bob@example.org,anyone@example.org, etc. This option exists only for backward compatibility and is not recommended.
To enable the Authorized senders only option:
- In the upper grid, click the Update
 button for the domain of interest.
 - Select the Send email from authorized senders only check box.
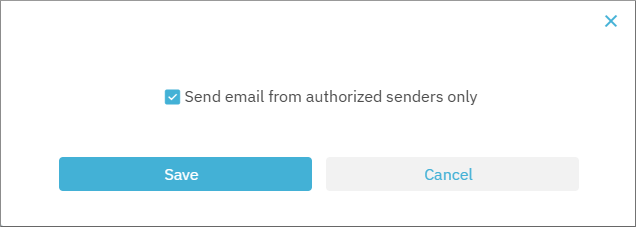
- Click Save.
Add/remove authorized email addresses
To add or remove authorized email senders:
- Click Add in the lower grid. A dialog box pops up.
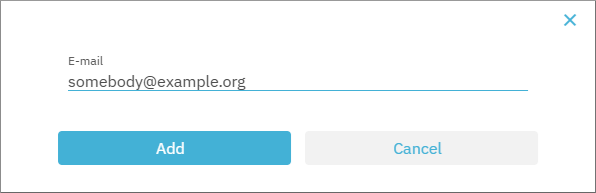
- Enter the email address, select the domain, and then click Add.
To delete an authorized email sender, click the Remove  button next to the record you want to remove.
GraphQL
You can also add and remove authorized senders programmatically, by running the addEmailSender and removeEmailSender mutations of the Email Service.
Delete a domain identity
You can delete previously created domain identities, both verified and unverified. The outcome of deleting a verified email domain is that email addresses having that domain will no longer be able to send email.
To delete a domain identity, click the Remove button next to the domain you want to remove.
GraphQL
To delete domain identities programmatically through GraphQL, run the deleteDomainIdentity mutation of the Email Service.
App password accounts
This tab displays Google or Microsoft email addresses that were authorized to send email via app password. For information about authorizing Google or Microsoft accounts to send email from SBS, see Sending email from a Google or Microsoft 365 email address.
Note that email accounts present in this list may or may not be able to send email, depending on whether the app password is still valid. For example, the email account cannot send email if the user has deleted the app password from their Microsoft of Google account.
Store an app password
Storing an app password in SBS is optional. This enables you to reuse the app password when sending email instead of having to enter it manually each time.
To store an app password:
-
Click Email in the left hand-side menu.
-
Click the App Password Accounts tab.
-
Click Add
. A dialog box pops up. -
Enter the Google or Microsoft email address and the app password. For instructions about obtaining an app password, see Obtaining a Google App Password and Obtaining a Microsoft 365 App Password.
-
Select the email provider (GOOGLE or MICROSOFT, as applicable).

-
Click Add.
You can now use the email address in the From field when sending an email, without having to enter its associated app password.
Update an app password
To update an existing app password:
- Click the app password account ID (the first column in the grid).
- Enter the new app password, and then click Save.
Delete an app password
To delete an app password, click the Remove button. Note that removing an app password from SBS does not remove it from your Google or Microsoft account.
Inbound domain
This tab displays the domain that was registered as inbound domain for the current tenant, if any. For example, if this value is my.app.socrate.email, then all email sent to this email domain will be received by the current tenant and visible in the Inbound tab. Examples:
sales@my.app.socrate.emailsupport@my.app.socrate.emailany.recipient@my.app.socrate.email
If there is no registered subdomain yet, then a Register inbound email button is displayed instead.
Register an email subdomain at tenant level
Registering an email subdomain at tenant level is required before you can receive any email.
To register an email subdomain at tenant level:
-
Click Email in the left hand-side menu.
-
Click the Inbound Domain tab.
-
Click Register Inbound Email. At this stage, you may see an error message that the inbound subdomain should be configured at application level first. If you see this message, sign in to the SBS Console and perform this step, as described in Register an inbound subdomain at application level. Otherwise, you should see a a dialog box like the one below:
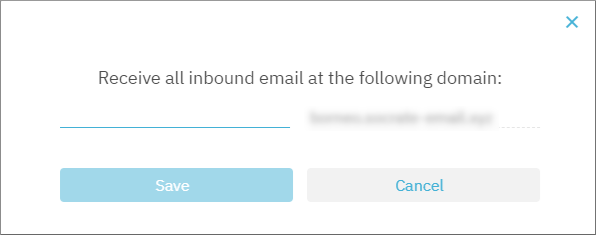
-
Enter the tenant subdomain to use. This string must be unique for each tenant if there are multiple tenants using the same app.
-
Click Save.
The configured inbound domain should now be displayed on the page. For example, if the inbound domain is ten.app.socrate.email, then any email recipient like {any-recipient}@ten.app.socrate.email will now reach your app.
GraphQL
If you prefer to use GraphQL, you can register a tenant subdomain by running the registerSubdomain mutation of the Email Service, for example:
mutation register_subdomain($input:RegisterSubdomainInput!){
  registerSubdomain(input:$input) {
    domain
    subdomain
  }
}
Make sure to use a subdomain name that is descriptive of your tenant:
{
  "input":{
    "subdomain": "YOUR_SUBDOMAIN_NAME"
  }
}
The result is similar to the following:
{
  "data": {
    "registerSubdomain": {
      "domain": "ten.app.socrate.email",
      "subdomain": "ten"
    }
  }
}
In the code listing above, the tenant subdomain is ten and the app subdomain is app. Therefore, any email sent to an address like recipient@ten.app.socrate.email will now reach your app.
Delete a registered subdomain
To delete a tenant-level email subdomain this, click the Delete Inbound Email Subdomain button. Be aware that the button is available only if the inbound email domain has already been configured.
Caution
You will no longer be able to receive email at this email domain if you delete it.
Address status (Amazon SES suppression list)
The Address Status tab provides a tool that is helpful to debug failed email delivery to certain email addresses.
To deliver email to recipients, SBS relies on Amazon Web Services (AWS). As part of its Amazon Simple Email Service (SES) offering, AWS maintains a list of email addresses that are suppressed for delivery, called Amazon SES suppression list. An email address may be added by AWS to the suppression list if delivery to that email address has failed due to various reasons.
To view whether an email address is on the Amazon SES suppression list:
- On the Address Status tab, enter the email address of interest, and then click Query Status.
If the returned status is OK, the email address is not on the suppression list and email delivery to this email address is not blocked by AWS.
If the returned status is SUPPRESSED, delivery to that email address is blocked by AWS, and the reason is displayed accordingly, for example:
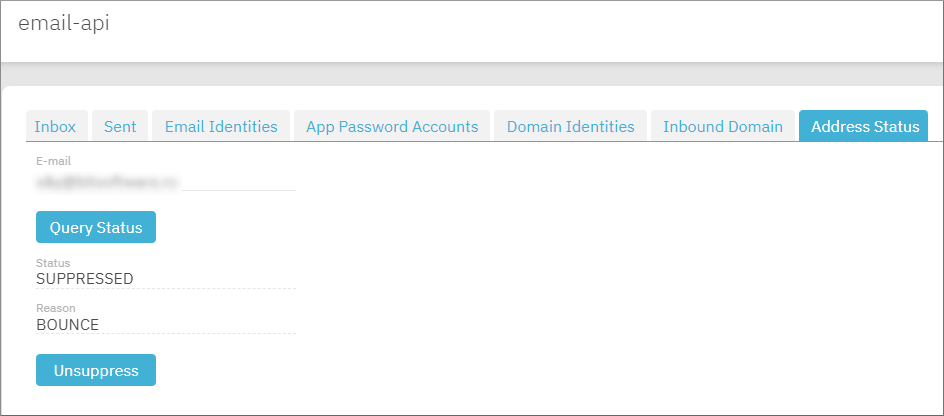
You can remove the email address from the suppression list if necessary. To do this, click Unsuppress. Note that this button is available only if the email address was actually found on the Amazon SES suppression list.
When you click Unsuppress, a request is sent to AWS to remove the email address from the suppression list and the outcome is displayed on the page. If the returned status is OK, the email address has been successfully removed from the suppression list.